Handler机制是什么?
当我们运行一个Android应用程序时,系统会创建一个进程,这个进程就是我们的主线程(UI线程-ActivityThread)。为了防止阻塞UI主线程,我们一般会将耗时的操作放到子线程中进行处理,处理完之后更新UI,但是Android不允许在子线程中操作UI,这违背了Android单线程模型的原则(Android UI操作并不是线程安全的并且这些操作必须在主线程中执行),为此Android提供了一套异步消息传递机制——Handler消息机制来实现线程之间的数据传递。因此,Handler机制是Android给我们提供的用于更新UI的一套消息处理机制。Handler贯穿了整个Android系统,它随处可见,在Android开发中有着非常重要的地位。
Handler机制主要角色
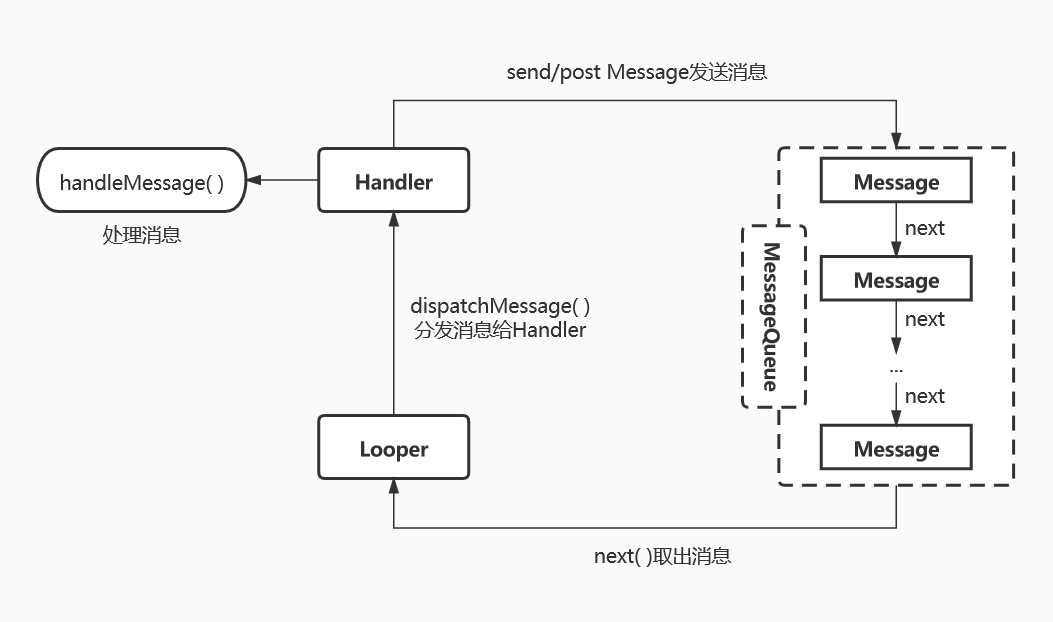
Android系统是以消息驱动的,整个消息流程可以大致概括为:
发送消息 --> 添加消息到队列 --> 从队列中获取消息 --> 处理消息上面的流程可以引出几个重要的类,分别是发送消息的Handler,将消息Message发送到消息队列MessageQueue,Looper从消息队列循环取出消息,然后交给Handler处理。
- Handler:处理者,负责Message的发送及处理。发送消息一般是使用Handler的sendMessage()方法、postXXX()方法;发出的消息最终会传递到Handler的handleMessage(Message msg)方法进行处理。
- Message:被发送和处理的消息,它可以在内部携带少量的信息,用于在不同线程之间传递数据。Message的what、arg1和arg2字段可以携带一些整型数据,obj字段携带一个Object对象。
- MessageQueue:存放消息的消息队列,用来存放Handler发送过来的消息,并按照FIFO(先进先出)规则执行。存放的Message并非实际意义的保存,而是将Message以链表的方式串联起来的,等待Looper的抽取。 每个线程中只会有一个MessageQueue对象。
- Looper:循环的从MessageQueue中取消息给 Handler处理,调用Looper的loop()方法后,就会进入一个无限循环当中,然后每当发现MessageQueue中存在一条满足执行条件的消息时,就会将它取出,并调用Handler的dispatchMessage(msg)方法进行分发处理。每个线程中只会有一个Looper对象。
了解Handler、Message、MessageQueue以及Looper的基本概念后,再来理一下Handler消息发送和处理的基本流程。首先创建一个Handler对象,并重写handleMessage()方法。然后当有需要传递数据的需求时,就创建一个Message对象,并通过创建的Handler将这条消息发送出去。之后这条消息会被添加到MessageQueue的队列中等待被处理,而Looper则会一直尝试从MessageQueue中取出待处理消息,最后分发回Handler的handleMessage()方法中。如果Handler是在主线程中创建或者创建Handler的时候构造函数中传入了Looper.getMainLooper(),则此时handleMessage()方法中的代码将会在主线程中运行,于是就可以进行UI操作了。整个异步消息处理机制的流程大致如下:
Handler机制的基本使用及源码解析
上面介绍了Handler机制中的几个重要角色,现在就通过实例来一步步的了解Handler源码。
首先在activity_main.xml中新增一个TextView和一个Button:
<?xml version="1.0" encoding="utf-8"?>
<LinearLayout xmlns:android="http://schemas.android.com/apk/res/android"
    android:layout_width="match_parent"
    android:layout_height="match_parent"
    android:orientation="vertical"
    android:padding="10dp"
    tools:context=".MainActivity">

    <TextView
        android:id="@+id/infoText"
        android:layout_width="wrap_content"
        android:layout_height="wrap_content"/>

    <Button
        android:id="@+id/updateBtn"
        android:layout_width="match_parent"
        android:layout_height="wrap_content"
        android:layout_gravity="center_horizontal"
        android:text="update" />
</LinearLayout>
然后在MainActivity中完成以下逻辑:
class MainActivity : AppCompatActivity() {

    private lateinit var binding: ActivityMainBinding
    private val handler = object : Handler(Looper.getMainLooper()) {
        override fun handleMessage(msg: Message) {
            super.handleMessage(msg)
            binding.infoText.text = "handle message"
        }
    }

    override fun onCreate(savedInstanceState: Bundle?) {
        super.onCreate(savedInstanceState)
        binding = ActivityMainBinding.inflate(layoutInflater)
        setContentView(binding.root)

        binding.updateBtn.setOnClickListener {
            thread {
                handler.sendEmptyMessage(0)
            }
        }
    }
}
可以看到我们创建了一个handler对象,并重写了handleMessage方法;然后在点击updateBtn的时候创建一个子线程,在子线程中使用handler的sendEmptyMessage方法发送消息。
示例中控件的绑定使用的是ViewBinding
运行一下项目,点击一下updateBtn按钮就可以在子线程中发送消息,并在主线程中更新UI了。
发送消息
发送消息有2种方式:sendXXX和postXXX。
- sendXXX()系列方法主要有下面几个方法
sendEmptyMessage(int what);//发送一个空的消息
sendMessage(@NonNull Message msg);//发送消息,消息中可以携带参数
sendMessageDelayed(int what, long delayMillis);//延时delayMillis(ms)发送消息
sendMessageAtTime(int what, long uptimeMillis);//未来某一时间点发送消息- postXXX()系列方法主要有下面几个方法
post(@NonNull Runnable r);//提交计划任务马上执行
postDelayed(@NonNull Runnable r, long delayMillis);//提交计划任务延时Nms执行
postAtTime(@NonNull Runnable r, long uptimeMillis);//提交计划任务在未来的时间点执行handler.sendXXX()和handler.postXXX()最终都会调用Handler的sendMessageDelayed()方法。
public final boolean sendMessageDelayed(@NonNull Message msg, long delayMillis) {
	if (delayMillis < 0) {
    	delayMillis = 0;
    }
	return sendMessageAtTime(msg, SystemClock.uptimeMillis() + delayMillis);
}然后调用了Handler的sendMessageAtTime方法
public boolean sendMessageAtTime(@NonNull Message msg, long uptimeMillis) {
	MessageQueue queue = mQueue;
    if (queue == null) {
    	RuntimeException e = new RuntimeException(
        	this + " sendMessageAtTime() called with no mQueue");
        Log.w("Looper", e.getMessage(), e);
        return false;
    }
    return enqueueMessage(queue, msg, uptimeMillis);
}再调用Handler的enqueueMessage(queue, msg, uptimeMillis)方法
private boolean enqueueMessage(@NonNull MessageQueue queue, @NonNull Message msg,
long uptimeMillis) {
	msg.target = this;
	msg.workSourceUid = ThreadLocalWorkSource.getUid();

	if (mAsynchronous) {
		msg.setAsynchronous(true);
	}
	return queue.enqueueMessage(msg, uptimeMillis);
}可以看到最终调用了MessageQueue的私有方法enqueueMessage(msg, uptimeMillis) 方法,点进MessageQueue看看。
boolean enqueueMessage(Message msg, long when) {
if (msg.target == null) {
//判断msg.target是否为空,target就是Handler
throw new IllegalArgumentException("Message must have a target.");
}
synchronized (this) {
if (msg.isInUse()) {
throw new IllegalStateException(msg + " This message is already in use.");
}
if (mQuitting) {
//这里判断线程是否已经销毁
IllegalStateException e = new IllegalStateException(
msg.target + " sending message to a Handler on a dead thread");
Log.w(TAG, e.getMessage(), e);
msg.recycle();
return false;
}
msg.markInUse();
msg.when = when;
Message p = mMessages;
boolean needWake;
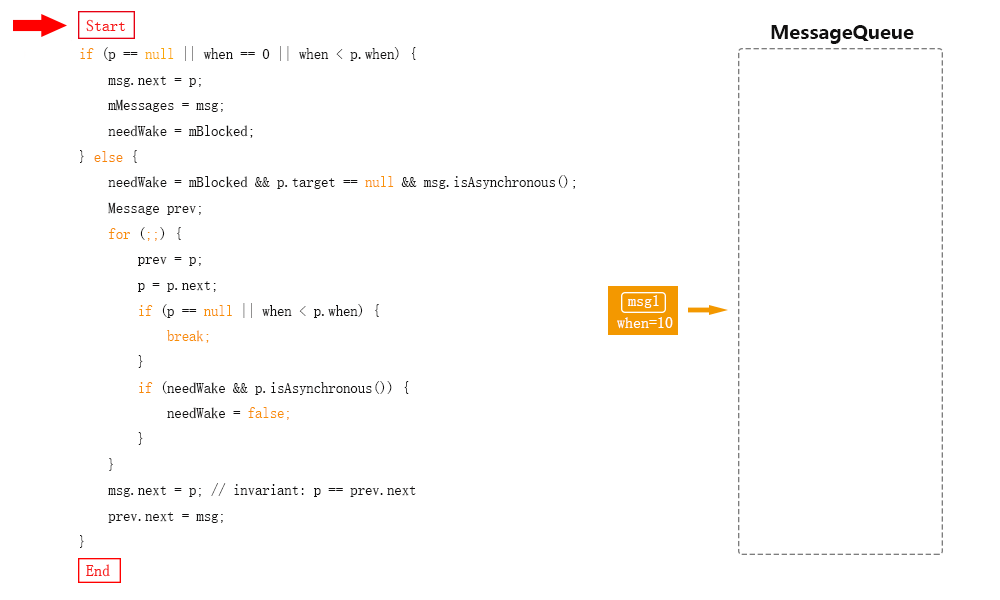
if (p == null || when == 0 || when < p.when) {
// 当消息队列为空或者将要入队的消息(msg)的时间(when)在所有消息队列的消息最前面,则把 msg插入到队头,最先执行
// New head, wake up the event queue if blocked.
msg.next = p;
mMessages = msg;
needWake = mBlocked;
} else {
// Inserted within the middle of the queue. Usually we don't have to wake
// up the event queue unless there is a barrier at the head of the queue
// and the message is the earliest asynchronous message in the queue.
//将消息按时间顺序插入到MessageQueue。
needWake = mBlocked && p.target == null && msg.isAsynchronous();
Message prev;
for (;;) {
prev = p;
p = p.next;
if (p == null || when < p.when) {
break;
}
if (needWake && p.isAsynchronous()) {
needWake = false;
}
}
msg.next = p; // invariant: p == prev.next
prev.next = msg;
}
// We can assume mPtr != 0 because mQuitting is false.
if (needWake) {
nativeWake(mPtr);
}
}
return true;
}看Message类的实现可以看出它是个单链表,消息队列中的消息都是按照时间先后顺序链接起来的。
在上面的if分支中有三个条件判断p == null || when == 0 || when < p.when,
- p == null:当p也就是mMessages为空,表示消息队列中还没添加过消息
- when == 0:when正常情况下表示当前时间SystemClock.uptimeMillis()加上延迟时间delayMillis,如果直接调用Handler的sendMessageAtTime,可能会出现when=0的情况
- when < p.when:新消息的时间when小于p消息的时间p.when
以上三个条件只要满足任一条件都会执行到if代码块中的语句,将新消息添加到p消息的前面,p消息为空时,即队头。
当添加新消息时,消息队列中有消息的时候,就会执行到else语句中,将消息按时间顺序插入到MessageQueue。
prev = p;
p = p.next;
第一行代码中的p就是在if代码块中添加的消息,说明指针指向p消息,第二行代码又将指针指向了p消息的下一个消息,指针向后移动了一位。消息添加到MessageQueue的流程大致如下:
取出消息
Looper.loop()方法不断的从MessageQueue中取消息。那么Looper.loop()方法是在哪里调用的呢?由于系统都是由消息驱动的,所以在系统启动的时候就应该有动力驱动了,在SystemServer.main()中调用了Looper.loop(),这是在系统层面的驱动,而对于APP应用层面来说,应用入口ActivityThread.main()中也需要调用Looper.loop(),毕竟APP也是需要各种事件响应。
下面分别看看SystemServer和ActivityThread的main方法:
com.android.server.SystemServer.java:407
public static void main(String[] args) {
	new SystemServer().run();
}

private void run() {
	try {
        ...
        // Prepare the main looper thread (this thread).
        android.os.Process.setThreadPriority(
			android.os.Process.THREAD_PRIORITY_FOREGROUND);
        android.os.Process.setCanSelfBackground(false);
        Looper.prepareMainLooper();
        Looper.getMainLooper().setSlowLogThresholdMs(
        	SLOW_DISPATCH_THRESHOLD_MS, SLOW_DELIVERY_THRESHOLD_MS);
		...
	} finally {
        t.traceEnd();  // InitBeforeStartServices
    }
	...
    // Loop forever.
    Looper.loop();
    throw new RuntimeException("Main thread loop unexpectedly exited");
}
android.app.ActivityThread.java:6707
public static void main(String[] args) {
    ...

    Looper.prepareMainLooper();

    ...
    ActivityThread thread = new ActivityThread();
    thread.attach(false, startSeq);

    if (sMainThreadHandler == null) {
        sMainThreadHandler = thread.getHandler();
    }

    if (false) {
        Looper.myLooper().setMessageLogging(new
                LogPrinter(Log.DEBUG, "ActivityThread"));
    }

    // End of event ActivityThreadMain.
    Trace.traceEnd(Trace.TRACE_TAG_ACTIVITY_MANAGER);
    Looper.loop();

    throw new RuntimeException("Main thread loop unexpectedly exited");
}可以看到SystemServer和ActivityThread的main方法中都调用了Looper.prepareMainLooper() 和 Looper.loop() 方法。首先看看Looper.prepareMainLooper() 的源码:
/**
 * Initialize the current thread as a looper, marking it as an
 * application's main looper. See also: {@link #prepare()}
 *
 * @deprecated The main looper for your application is created by the Android environment,
 *   so you should never need to call this function yourself.
 */
@Deprecated
public static void prepareMainLooper() {
    prepare(false);
    synchronized (Looper.class) {
        if (sMainLooper != null) {
            throw new IllegalStateException("The main Looper has already been prepared.");
        }
        sMainLooper = myLooper();
    }
}

private static void prepare(boolean quitAllowed) {
    if (sThreadLocal.get() != null) {
        throw new RuntimeException("Only one Looper may be created per thread");
    }
    sThreadLocal.set(new Looper(quitAllowed));
}

private Looper(boolean quitAllowed) {
	mQueue = new MessageQueue(quitAllowed);
    mThread = Thread.currentThread();
}

public static void prepare() {
    prepare(true);
}prepareMainLooper方法中又调用了prepare(boolean quitAllowed)方法,然后prepare方法中创建了一个Looper实例并设置给sThreadLocal变量,Looper构造函数中又创建了MessageQueue对象。sThreadLocal保证了一个线程只有一个Looper,而一个Looper又只有一个MessageQueue。
prepareMainLooper方法标记为Deprecated,是因为应用程序的主线程Looper应该由系统自动为我们初始化,不需要我们自己去调。
从源码中看到私有方法prepare有一个参数quitAllowed,prepareMainLooper中传的是false,prepare()方法中传的是true,说明主线程中的Looper不允许退出。
分析完Looper.prepareMainLooper() 之后,再来看看Looper.loop() 方法。
public static void loop() {
    final Looper me = myLooper();  // 先获取Looper对象
    if (me == null) {
        throw new RuntimeException("No Looper; Looper.prepare() wasn't called on this thread.");
    }
    ...
    for (;;) {
        Message msg = queue.next(); // might block 获取消息,无消息时可能会阻塞
        if (msg == null) {
            // No message indicates that the message queue is quitting.
            return;
        }

        ...
        try {
            msg.target.dispatchMessage(msg); // 调用target(Handler)分发消息
            if (observer != null) {
                observer.messageDispatched(token, msg);
            }
            dispatchEnd = needEndTime ? SystemClock.uptimeMillis() : 0;
        } catch (Exception exception) {
            if (observer != null) {
                observer.dispatchingThrewException(token, msg, exception);
            }
            throw exception;
        }
      	...
        msg.recycleUnchecked(); //回收消息
    }
}
首先要获取到Looper对象,当Looper对象为空时抛出异常No Looper; Looper.prepare() wasn't called on this thread.,我们就知道调用loop()方法之前需要先调用prepare()方法,在上面的prepareMainLooper() 和 prepare()中创建出了Looper对象。
获取到了Looper对象后,就从Looper中获取MessageQueue对象queue,然后在for(,,)循环中调用queue.next()取消息,当消息队列中没有消息时,就会阻塞在queue.next()这里。来看看queue.next()中做了什么:
Message next() {
    ...
    int nextPollTimeoutMillis = 0;
    for (;;) {
        if (nextPollTimeoutMillis != 0) {
            Binder.flushPendingCommands();
        }

        nativePollOnce(ptr, nextPollTimeoutMillis);

        synchronized (this) {
            // Try to retrieve the next message.  Return if found.
            final long now = SystemClock.uptimeMillis();
            Message prevMsg = null;
            Message msg = mMessages;
            if (msg != null && msg.target == null) {
                // Stalled by a barrier.  Find the next asynchronous message in the queue.
                do {
                    prevMsg = msg;
                    msg = msg.next;
                } while (msg != null && !msg.isAsynchronous());
            }
            if (msg != null) {
                if (now < msg.when) {
                    // Next message is not ready.  Set a timeout to wake up when it is 						ready. 当前时间小于消息的时间,说明还没有到该消息执行的时候,计算出消息执行					  的延时时间
                    nextPollTimeoutMillis = (int) Math.min(msg.when - now, Integer.MAX_VALUE);
                } else {
                    // Got a message.
                    mBlocked = false;
                    if (prevMsg != null) {
                        prevMsg.next = msg.next;
                    } else {
                        // msg将要进行处理,然后会将处理的消息删除,所以消息指针需要向后移一位
                        mMessages = msg.next;
                    }
                    msg.next = null; // 表示将msg从消息队列中剔除
                    if (DEBUG) Log.v(TAG, "Returning message: " + msg);
                    msg.markInUse();
                    return msg;
                }
            } else {
                // No more messages. 没有消息,继续休眠等待
                nextPollTimeoutMillis = -1;
            }
			...
        }
      	...
    }
}next()里面是一个死循环,如果消息队列中没有消息的时候会堵塞在next()方法处让CPU休眠,消息队列中有消息的时候,则取出消息,判断当前时间和该消息执行时间的先后关系,没到执行时间则继续休眠等待,否则就返回消息给Looper.loop()方法进行处理并从消息队列中移除该msg,enqueueMessage()和next()方法中都用了同步锁,避免在发送消息时取消息以及取消息时发送消息,保证了线程安全。
处理消息
在上一步取出消息之后,loop()方法中调用了:
msg.target.dispatchMessage(msg);这里的target就是在Handler的enqueueMessage方法在发送消息时设置的Handler对象。所以来看看Handler的dispatchMessage方法:
public void dispatchMessage(@NonNull Message msg) {
    if (msg.callback != null) {
        handleCallback(msg);
    } else {
        if (mCallback != null) {
            if (mCallback.handleMessage(msg)) {
                return;
            }
        }
        handleMessage(msg);
    }
}
若msg.callback和mCallback都为空,则会执行handleMessage(msg)。
/**
 * 子类必须实现这个方法才能收到消息
 * Subclasses must implement this to receive messages.
 */
public void handleMessage(@NonNull Message msg) {
}
上面只说了msg.callback和mCallback都为空的情况,会调用Handler的handleMessage方法处理消息,现在来分别看看msg.callback和mCallback不为空处理消息的情况。
首先,msg.callback是在创建Message的时候赋值的,
public static Message obtain(Handler h, Runnable callback) {
	Message m = obtain();
  	m.target = h;
    m.callback = callback;
    return m;
}
我们现在修改一下MainActivity的代码,然后运行一下发现同样可以更新infoText的信息:
class MainActivity : AppCompatActivity() {

    private lateinit var binding: ActivityMainBinding
    //这里只创建handler对象,没有重写handleMessage方法
    private val handler = Handler()

    override fun onCreate(savedInstanceState: Bundle?) {
        super.onCreate(savedInstanceState)
        binding = ActivityMainBinding.inflate(layoutInflater)
        setContentView(binding.root)

        binding.updateBtn.setOnClickListener {
            thread {
                val message = Message.obtain(handler) {
                    binding.infoText.text = "Message Callback"
                }
                handler.sendMessage(message)
            }
        }
    }
}
这里创建message时,使用了Message的obtain(handler, runnable)重载方法,而不是使用new Message()的方式,因为obtain()方法内部是直接从系统的Message缓存池中获取的Message对象,效率更高:
public static Message obtain(Handler h, Runnable callback) {
	Message m = obtain();
    m.target = h;
    m.callback = callback;
    return m;
}

public static Message obtain() {
    synchronized (sPoolSync) {
        if (sPool != null) {
            Message m = sPool;
            sPool = m.next;
            m.next = null;
            m.flags = 0; // clear in-use flag
            sPoolSize--;
            return m;
        }
    }
    return new Message();
}
Message的obtain方法还有很多重载方法,每个方法传的参数不一样,根据不同的需求来选择调用对应的方法即可,具体的源码就不展开了。
public static Message obtain(){}
public static Message obtain(Message orig){}
public static Message obtain(Handler h){}
public static Message obtain(Handler h, Runnable callback){}
public static Message obtain(Handler h, int what){}
public static Message obtain(Handler h, int what, Object obj){}
public static Message obtain(Handler h, int what, int arg1, int arg2){}
public static Message obtain(Handler h, int what, int arg1, int arg2, Object obj){}最后再来看看mCallback不为空的情况,mCallback是在构造Handler的时候赋值的。
public Handler(@Nullable Callback callback, boolean async) {
    ...
    mLooper = Looper.myLooper();
    if (mLooper == null) {
        throw new RuntimeException(
                "Can't create handler inside thread " + Thread.currentThread()
                        + " that has not called Looper.prepare()");
    }
    mQueue = mLooper.mQueue;
    mCallback = callback;
    mAsynchronous = async;
}
继续修改一下MainActivity的代码:
class MainActivity : AppCompatActivity() {

    private lateinit var binding: ActivityMainBinding
    private val handler = Handler(object : Handler.Callback {
        override fun handleMessage(msg: Message): Boolean {
            binding.infoText.text = "handle Callback message${msg.what}"
            return true
        }
    })

    override fun onCreate(savedInstanceState: Bundle?) {
        super.onCreate(savedInstanceState)
        binding = ActivityMainBinding.inflate(layoutInflater)
        setContentView(binding.root)

        binding.updateBtn.setOnClickListener {
            thread {
                handler.sendEmptyMessage(12)
            }
        }
    }
}
我们使用了Handler(callback)构造参数创建handler对象,callback的handleMessage方法接收一个Boolean返回值,如果返回false,则执行完Callback的handleMessage方法之后,还会执行Handler的handleMessage方法,所以这里我们返回true,dispatchMessage方法执行mCallback.handleMessage(msg)之后直接return了。
public void dispatchMessage(@NonNull Message msg) {
    if (msg.callback != null) {
        handleCallback(msg);
    } else {
        if (mCallback != null) {
            if (mCallback.handleMessage(msg)) {
                return;
            }
        }
        handleMessage(msg);
    }
}
到这里,Handler机制的基本流程:发送消息、取出消息、处理消息 就已经分析完了。这样一些常见的问题就可以知道答案了。
Handler常见问题解答
1.Handler是如何做到在主线程更新UI的?
如果Handler是在主线程中创建或者Handler在子线程创建时构造函数中传入了Looper.getMainLooper(),则可以实现在主线程中更新UI。
答案就在于Looper的创建和loop()的执行了,由前面分析的“取出消息” 流程中可以知道,应用的主线程Looper的创建和loop()的执行是在ActivityThread.main() 方法中,因此Looper.loop() 方法取出消息之后,调用msg.target.dispatchMessage(msg); 分发处理消息就自然是在主线程中执行了。
2.如何处理Handler导致的内存泄漏?
Handler使用过程中,我们需要特别注意一个问题,那就是Handler可能会导致内存泄漏。
具体原因如下:
- Handler的生命周期与Activity不同,Handler会关联Looper来管理Message Queue。这个队列在整个Application的生命周期中存在,因此Handler不会因Activity的finish()方法而被销毁。
- 非静态(匿名)内部类会持有外部对象,当我们这样重写Handler时它就成为了一个匿名内部类,这样如果调用finish方法时Handler有Message未处理的话,就会导致Activity不能被销毁。
解决方法
- 可以在外部新建一个类,在外部类对象被销毁时,将MessageQueue中的消息清空。
override fun onDestroy() {
	super.onDestroy()
    handler.removeCallbacksAndMessages(null)
}- 可以同时使用静态内部类和弱引用,当一个对象只被弱引用依赖时它便可以被GC回收。注意,要static和弱引用要同时使用,否则由于非静态内部类隐式持有了外部类Activity的引用,而导致Activity无法被释放
companion object class TestHandler(activity: Activity) : Handler(Looper.getMainLooper()) {
    private val mActivity: WeakReference<Activity> = WeakReference(activity)

    override fun handleMessage(msg: Message) {
        super.handleMessage(msg)
        val activity: MainActivity = mActivity.get() as MainActivity;
        activity.binding.infoText.text = "handleMessage"
    }
}

override fun onCreate(savedInstanceState: Bundle?) {
    super.onCreate(savedInstanceState)
  	...
  	handler = TestHandler(this@MainActivity)
}
3.子线程创建Handler抛异常?
有时候可能会有主线程发送消息给子线程处理的场景,但是在子线程中创建Handler之后,运行时出现了异常Can't create handler inside thread that has not called Looper.prepare() 。
class MainActivity : AppCompatActivity() {

    private lateinit var binding: ActivityMainBinding
    private lateinit var handler: Handler

    override fun onCreate(savedInstanceState: Bundle?) {
        super.onCreate(savedInstanceState)
        binding = ActivityMainBinding.inflate(layoutInflater)
        setContentView(binding.root)

        binding.updateBtn.setOnClickListener {
            thread {
                handler = object: Handler() {
                    override fun handleMessage(msg: Message) {
                        super.handleMessage(msg)
                        binding.infoText.text = "child thread message"
                        Log.e("MainActivity", "handleMessage: child thread message" )
                    }
                }
            }
        }

        binding.sendMessageBtn.setOnClickListener {
            handler.sendEmptyMessage(12)
        }
    }
}
上面的代码中,我们点击updateBtn的时候在子线程中创建了一个Handler, 结果一运行就出现了上面的异常。这是因为我们在子线程创建Handler的时候还没有创建Looper对象,我们需要手动添加Looper.prepare()和Looper.loop() 。
class MainActivity : AppCompatActivity() {

    private lateinit var binding: ActivityMainBinding
    private lateinit var handler: Handler

    override fun onCreate(savedInstanceState: Bundle?) {
        super.onCreate(savedInstanceState)
        binding = ActivityMainBinding.inflate(layoutInflater)
        setContentView(binding.root)

        binding.updateBtn.setOnClickListener {
            thread {
                Looper.prepare()
                handler = object: Handler() {
                    override fun handleMessage(msg: Message) {
                        super.handleMessage(msg)
                        binding.infoText.text = "child thread message"
                        Log.e("MainActivity", "handleMessage: child thread message" )
                    }
                }
                Looper.loop()
            }
        }

        binding.sendMessageBtn.setOnClickListener {
            handler.sendEmptyMessage(12)
        }
    }
}
修改之后运行发现,创建Handler不会出现问题了,但是点击sendMessageBtn发送消息时,报如下的异常:
android.view.ViewRootImpl$CalledFromWrongThreadException: Only the original thread that created a view hierarchy can touch its views.
这是因为我们在子线程中创建的Looper和Handler,handleMessage(msg) 方法就会在子线程中回调,因此不能操作UI了。
Handler机制扩展
为了更加方便的使用Handler消息机制,Android也提供了几种扩展方式,内部实现都是基于Handler消息机制.
- Activity.runOnUiThread(Runnable)
class MainActivity : AppCompatActivity() {

    private lateinit var binding: ActivityMainBinding

    override fun onCreate(savedInstanceState: Bundle?) {
        super.onCreate(savedInstanceState)
        binding = ActivityMainBinding.inflate(layoutInflater)
        setContentView(binding.root)

        binding.updateBtn.setOnClickListener {
            thread {
                runOnUiThread {
                    binding.infoText.text = "runOnUiThread Message"
                }
            }
        }

    }
}看runOnUiThread的代码:
public final void runOnUiThread(Runnable action) {
    if (Thread.currentThread() != mUiThread) { // 判断当前线程是不是UI线程
        mHandler.post(action); // 不是UI线程,则使用handler的post方式,发送消息到主线程执行
    } else {
        action.run(); // 当前已经是UI线程了, 则直接执行Runnable的run()方法
    }
}- View.post(Runnable)
class MainActivity : AppCompatActivity() {

    private lateinit var binding: ActivityMainBinding

    override fun onCreate(savedInstanceState: Bundle?) {
        super.onCreate(savedInstanceState)
        binding = ActivityMainBinding.inflate(layoutInflater)
        setContentView(binding.root)

        binding.updateBtn.setOnClickListener {
            thread {
                binding.infoText.post {
                    binding.infoText.text = "view post Message"
                }
            }
        }
    }
}
看看View的post方法:
public boolean post(Runnable action) {
    final AttachInfo attachInfo = mAttachInfo;
    if (attachInfo != null) {
        return attachInfo.mHandler.post(action); //调用attachInfo的Handler实例post消息
    }

    // Postpone the runnable until we know on which thread it needs to run.
    // Assume that the runnable will be successfully placed after attach.
    getRunQueue().post(action);
    return true;
}
HandlerThread
常见的异步形式有Thread、HandlerThread、AsyncTask、IntentService等。
HandlerThread继承Thread,内部维护了一个Looper和Handler,完整源码如下。
public class HandlerThread extends Thread {
    int mPriority;
    int mTid = -1;
    Looper mLooper;
    private @Nullable Handler mHandler;

    public HandlerThread(String name) {
        super(name);
        mPriority = Process.THREAD_PRIORITY_DEFAULT;
    }

    public HandlerThread(String name, int priority) {
        super(name);
        mPriority = priority;
    }

    /**
     * Call back method that can be explicitly overridden if needed to execute some
     * setup before Looper loops.
     */
    protected void onLooperPrepared() {
    }

    @Override
    public void run() {
        mTid = Process.myTid();
        Looper.prepare(); // 创建Looper对象
        synchronized (this) {
            mLooper = Looper.myLooper(); // 上一步创建的Looper赋值给mLooper变量
            notifyAll();
        }
        Process.setThreadPriority(mPriority);
        onLooperPrepared();
        Looper.loop(); // loop循环
        mTid = -1;
    }

    public Looper getLooper() {
        if (!isAlive()) {
            return null;
        }

        // If the thread has been started, wait until the looper has been created.
        synchronized (this) {
            while (isAlive() && mLooper == null) {
                try {
                    wait();
                } catch (InterruptedException e) {
                }
            }
        }
        return mLooper;
    }

    /**
     * @return a shared {@link Handler} associated with this thread
     * @hide
     */
    @NonNull
    public Handler getThreadHandler() {
        if (mHandler == null) {
            mHandler = new Handler(getLooper());
        }
        return mHandler;
    }

    public boolean quit() {
        Looper looper = getLooper();
        if (looper != null) {
            looper.quit();
            return true;
        }
        return false;
    }

    public boolean quitSafely() {
        Looper looper = getLooper();
        if (looper != null) {
            looper.quitSafely();
            return true;
        }
        return false;
    }

    /**
     * Returns the identifier of this thread. See Process.myTid().
     */
    public int getThreadId() {
        return mTid;
    }
}
看看HandlerThread的基本使用:
class MainActivity : AppCompatActivity() {

    private lateinit var binding: ActivityMainBinding
    private lateinit var handlerThread: HandlerThread
    private lateinit var handler: Handler

    override fun onCreate(savedInstanceState: Bundle?) {
        super.onCreate(savedInstanceState)
        binding = ActivityMainBinding.inflate(layoutInflater)
        setContentView(binding.root)

        handlerThread = HandlerThread("ThreadName")
        handlerThread.start()

        handler = object : Handler(handlerThread.looper) {
            override fun handleMessage(msg: Message) {
                super.handleMessage(msg)
                Thread.sleep(2000)
                Log.e("handlerThread", "handlerThread message")
            }
        }

        binding.sendMessageBtn.setOnClickListener {
            handler.sendEmptyMessage(0)
        }

        binding.quitBtn.setOnClickListener {
            handlerThread.quit()
        }

    }
}这里的handleMessage(msg)方法运行在子线程中,因此可以执行一些耗时操作,但是不能操作UI。quitBtn按钮点击时会执行handlerThread.quit() 停止接收消息,从上面的源码中可以看到其实是调用的Looper.quit()方法,最终会调用MessageQueue的quit(boolean safe) 方法清空消息池中的所有消息。
void quit(boolean safe) {
    if (!mQuitAllowed) {
        throw new IllegalStateException("Main thread not allowed to quit.");
    }

    synchronized (this) {
        if (mQuitting) {
            return;
        }
        mQuitting = true;

        if (safe) {
            removeAllFutureMessagesLocked();
        } else {
            removeAllMessagesLocked();
        }

        // We can assume mPtr != 0 because mQuitting was previously false.
        nativeWake(mPtr);
    }
}参数safe如果等于true,则调用removeAllFutureMessagesLocked() 这个方法只会清空MessageQueue消息池中所有的延迟消息,消息池中所有的非延迟消息还是会派发出去让Handler去处理;如果safe=false,则调用removeAllMessagesLocked() ,所有延时消息和非延时消息都会本清空。